BMP085 Digital Pressure Sensor Interface
Description

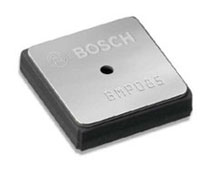
Relased on October 2009, the Bosch BMP085 barometric pressure sensor can be used to measure atmospheric pressure. In meteorology, data from multiple barometric sensors with combination of wind and temperature can forecast short term weather condition. It also can be use as an altimeter to determine altitude of the sensor above sea level.
Features
- Barometric pressure and Temperature reading
- USB serial emulator output
- LED indicator
Hardware
Let’s set up the BMP085. You will need the following parts:
- MonkeyBUS
- BMP085
- 2 off 2.2k resistor
- 1 off 100nF capacitor
- LCC8 to DIP8 convertor
Or
- Search around the interweb for BMP085 breakout board
BMP065 Wireup
The sensor voltage input range is between 1.8V to 3.6V. So we make sure to set the JP4 to 3.3V. Since we are using I2C, linkup the two pull-up resistors on SJ1 and SJ2. That is all we need to do for the MonkeyBUS.

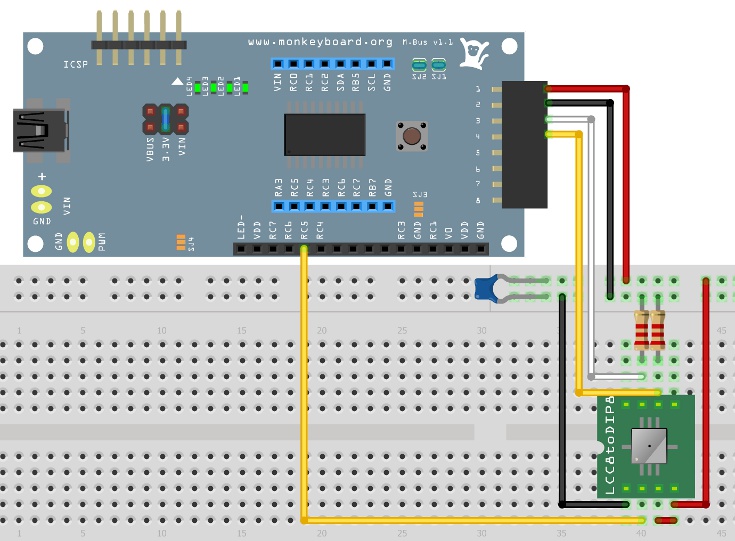
Next, wire up the MonkeyBUS and BMP085 like the following image. If you have a breakout board that has the necessary component to run the devices, you can wire the SDA and SCL directly to the breakout board. The EOC line is connected to an input on the MonkeyBUS. This will tell your program that a conversion has ended and the data is valid.

Here is the pin description for BMP085
| Pin No | Symbol | Function |
|
1 |
GND |
Ground |
|
2 |
EOC |
End of conversion |
|
3 |
VDDA |
Power supply |
|
4 |
VDDD |
Digital power supply |
|
5 |
NC |
No internal connection |
|
6 |
SCL |
I2C serial data clock input |
|
7 |
SDA |
I2C serial serial bus data |
|
8 |
XCLR |
Master clear (low active) input |
Software
Once all the wiring is complete, connect the MonkeyBUS with a USB cable to your PC and start cutting some code. We will briefly go through the following section of the code:
- Setting up input
- Setting up I2C
- BMP085 communication
Setting Up Input
An input is used to read the EOC (end of conversion) pin on the BMP085. This pin is set when pressure or temperature conversion is complete and low when it is still in process. This example uses RC5 to read EOC, so in the userinit function add the line:
TRISCbits.RC5 = 1;
And set all input to digital.
ANSEL = 0;
Setting I2C
The BMP085 uses I2C for communication. To initialise the I2C peripheral on the PIC18F14K50 controller, use the function below:
void InitializeI2C (void);
This function sets and enables the I2C on PIC18 to master mode and the SSPADD variable can be calculated by:

Where Fosc is the operating Clock which is the crystal frequency multiplied by the PLL. The PLL is configured to be 4 and the crystal frequency on the MonkeyBUS is 12MHz. Therefore, the operating clock is 4 x 12MHz = 48MhHz and for 10kHz I2C clock, SSPADD is set to 119.
Once the I2C is setup, the code will follow the flowchart in the BMP085 datasheet.

The BMP085 are shipped celebrated from factory with 11 16bits variable call calibration coefficient stored in its EEPROM. All 11 variables have some influence in the final calculation of celebrated Barometric pressure and temperature. These variables are read once in the start of the program and being used every time calculation is being done.
BMP085Calibration(void);
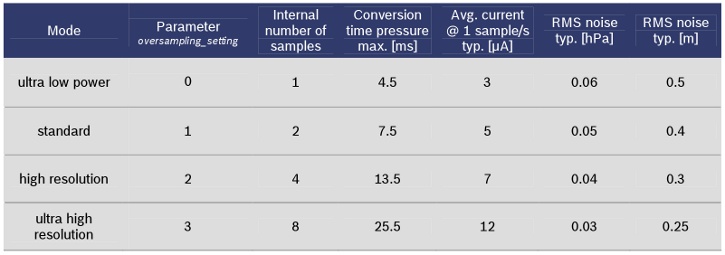
The next part is to read the uncompensated temperature and pressure value. BMP085 offers an oversampling setting (OSS). It can be either 0, 1, 2, or 3. OSS determines how many samples the BMP085 takes before releasing the readings. The more samples it takes the more power it consumes. OSS value can be changed at the top of the example currently defined as 0.
#define OSS 0
The table for OSS value and its influence to the overall system is shown below:

As the table shows, depending on the oversampling setting (OSS), the uncompensated pressure value will take a different amount of time to covert, whilst the temperature will require constant 4.5ms for conversion. The BMP085 offers a hardware pin (EOC end-of-conversion) to tell the software when conversion is complete. In multithreaded software, this pin can be used as an interrupt, or in the case of this example, the software will wait until the EOC line goes high before reading the register. The following function reads the uncelebrated pressure (UP) and temperature (UT):
Bmp085ReadUp (void);
Bmp085ReadUt(void);
Now, the complicated mathematic calculation is carried out to find compensated pressure and temperature value. This is done in the function below:
void bmp085Convert(long* temperature, long* pressure)
Note several lines of the calculation require to division of 2x numbers. Beware that right shifting (>>) works for division of unsigned numbers with power of 2 numbers but in older processors this could be erroneous with signed numbers. To avoid such error, the conversion function uses the result of 2 the power of x for division. So instead of
x1 = ((long)ut - ac6) * ac5 >> 15;
use
x1 = ((long)ut - ac6) * ac5 / 0x8000;
After temperature and pressure value is acquired, the following function will print it out to the USB serial port emulator at 19200 baud.
PrintBmpData (temperature, pressure);
Feel free to modify the above function to suit. You may want to format it include decimal point for temperature or have it coma separated so you can insert the data into a spreadsheet later.
When programming using the PIC18F, be mindful of how much memory your program is using. In the example, the size of the USB buffer is reduce to 20 bytes to free up some memory. The linker does not always give you warning when memory is running low which will result in unstable program.
Final Thoughts
This simple example shows how to use the MonkeyBUS to communicate with the BMP085 via I2C. Only thing to look out for working with this sensor is the casting of variable. A small error will threw out your final calculation. Other than that, it is very easy and fun to work with.
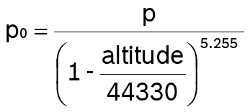
Comparing the change of barometric pressure on a spread sheet gives you some idea of what the weather will be like in the next couple of hours. Use the formula to calculate the difference in pressure compare to sea level.

p0 is known to be 101325. You can find the altitude of your sensor from this website. Plug it all in to the above formula and compare the difference with the BMP085 reading. These values should give you some idea of the weather condition to come. Check your local weather station to see how close you get with your prediction. We are now one step closer to build our simple weather station.
Downloads
PIC18F14K50 I2C Datasheet
Bosch BMP085 Datasheet
BMP085 for MonkeyBUS Firmware source code


